Take Control and Shoot in Manual Mode (A beginners guide)
I've recently begun a photography Meetup group here in London, teaching people how to take better images. We had our first get together a fortnight back and one of the biggest questions I was asked is how to move from shooting auto, to shooting manual, and this is the right question to ask.
Don't get me wrong, it does take a little bit to get your head around, but so did learning how to change gears while driving. Now you never think about it. It's second nature.
So why would you want to learn to shoot in manual mode?
Well shooting manual allows you to make the decisions, not your camera. Ever wondered why when you are shooting in a dark room your images are blurry? Because you are letting your camera choose your settings. Are you getting very grainy images in some shots? That's your camera making decisions for you. Do you want to learn how to shoot stars at night, or light trails from cars streaking down a freeway? Then you have to take back creative control.
So let me see if I can break this down simply for you.
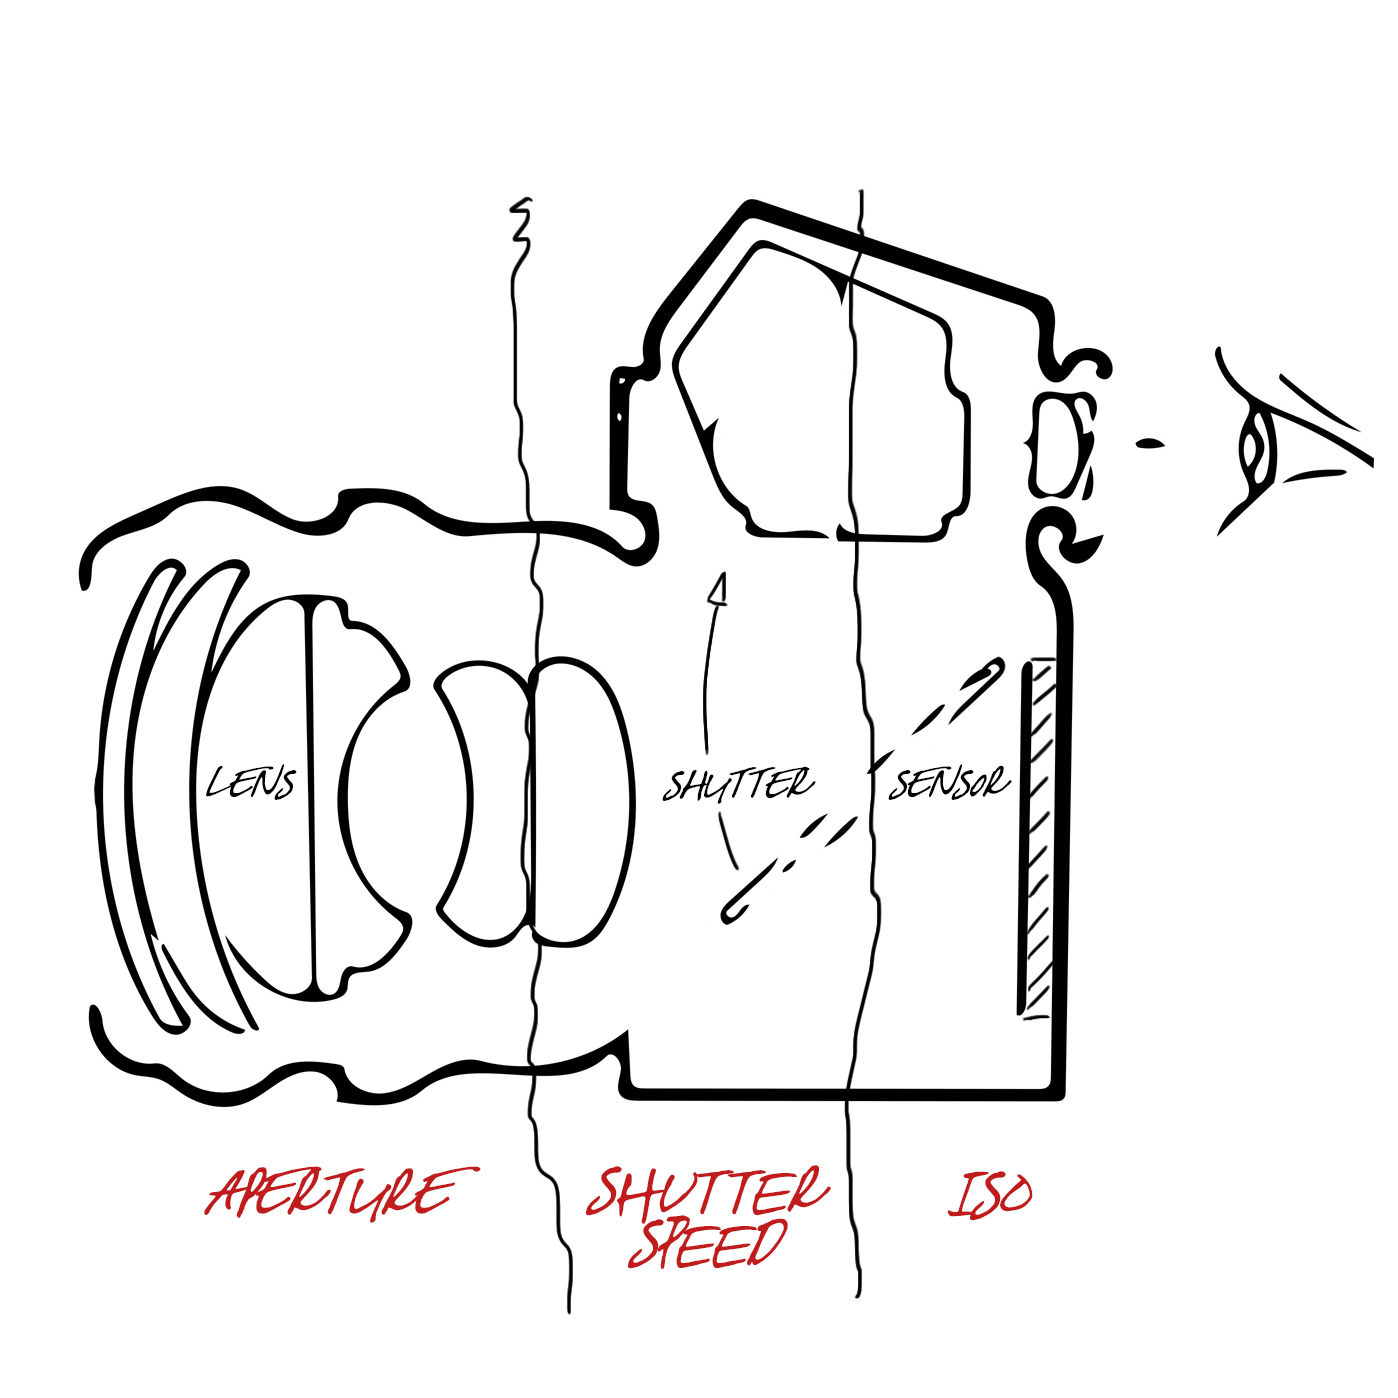
The first thing you need to understand is how a basic camera records light.
There are 3 elements which go in to determining how much light is recorded in any exposure you make:
APERTURE: This relates to the size of the hole which opens up in your lens to let light in. Normally Aperture is denoted as an F-number and describes how wide the lens is opening up to let light in. F22 is a fairly small aperture in your lens and won't let a lot of light in, where as a good quality lens may open up to F1.2 which will be a very wide aperture and lets a lot of light in.
SHUTTER SPEED: This relates to the length of time which the shutter opens within the body of the camera to expose the film or the sensor to the light coming in through the lens aperture. When you hear that click after pressing the shutter button, that is the sound of your shutter opening and closing to allow light to hit your sensor so it can capture an image. Shutter speed is given in increments of time from 1/8000 of a second being a very fast shutter which doesn't let a lot of light through, to 30 seconds which would expose the sensor to light for a long period of time.
ISO: This relates to you camera sensor, or your film stock. In the old days of shooting film people understood this well. If you knew you would be shooting on a bright sunny day you would buy less sensitive film, namely 100 speed. If you were going to be shooting in a low light situation you would buy 1600 speed film because it was very sensitive and captured more light coming in. The digital age has kept these numbers and we now talk about setting the sensitivity of our sensor for different lighting situations as our ISO number. The common ISO range is from 100 to 6400 in most modern cameras and the important thing to remember is that the higher your ISO number, the more sensitive your sensor is to light coming in.
Here is a diagram explaining these 3 elements within the camera:
Still with me?
Good.
This brings us to the Exposure Triangle:
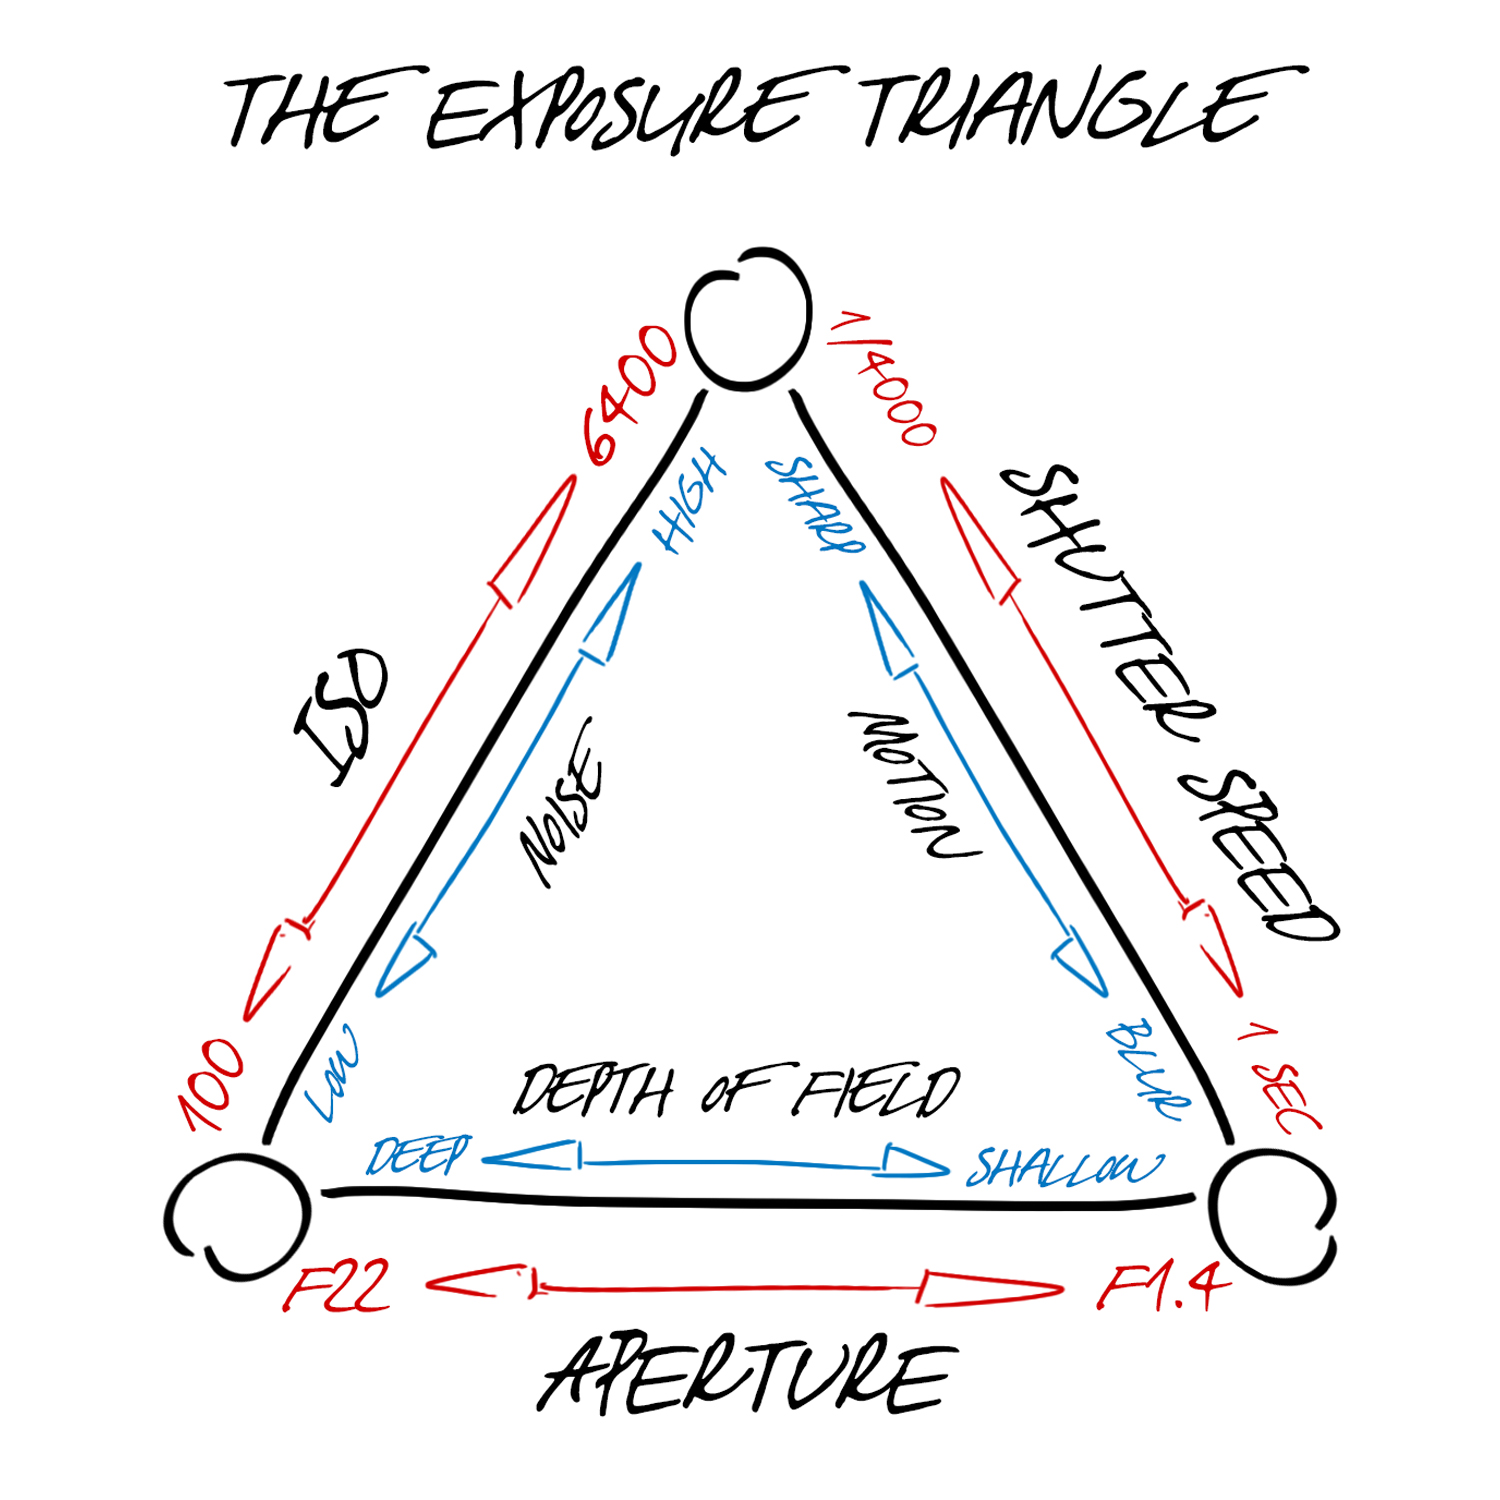
To take complete control of your camera by shooting in manual mode, you are going to be balancing the amount of light captured using the 3 elements we've been talking about: Aperture, Shutter Speed and ISO.
To do this well you need to know what effect each one has on the image you take:
APERTURE EFFECTS DEPTH OF FIELD: When you open up your aperture you are obviously letting in more light, but as a trade off you also create a more shallow depth of field. Depth of field describes how much of your shot is in focus.
A deep depth of field means that both the foreground and the far distance will all be in focus. This is used by landscape photographers who want the whole scene they are shooting to be sharp, so they may choose to capture a vista at f16 for example.
Conversely a shallow depth of field means that there is only a thin slice of focus. Ever wondered how photographers achieve nice blurry backgrounds in their portraits whilst keeping their subject sharp? They are opening their aperture up and shooting at f1.4 or similar. Obviously shooting like this you need to be very sure of your focus point as it's easy to have your subject out of focus.

Here is a fun shot I took of my wife recently on a 50mm lens, opening the aperture right up to f1.4 so I could just focus in on the eyes and let everything else fall out of focus. This is using a shallow depth of field:
SHUTTER SPEED EFFECTS THE APPEARANCE OF MOTION: When you speed up your shutter to block out light it also has the effect of freezing motion within the frame.
A fast shutter of 1/4000 of a second for example would be ideal for a sports photographer who wants to capture an athlete running at high speed and freeze the action in the frame while maintaining sharp detail.
On the other hand maybe you want to slow your shutter right down and create blur. For example, photographers who want to shoot light trails, or be creative with motion blur when shooting dancers will shoot at slower shutter speeds. It's important to make sure that you are shooting from a tripod when doing this or you will also capture your hands shaking holding the camera.
(This answers a very common question people have about getting blurry photos. What is happening is that in auto your camera is choosing to slow down your shutter speed in low light and so it's picking up the shake of your hands and creating a blurry image. The rule of thumb is that your shutter speed fraction should never be slower than the focal length of your lens. In other words if you are shooting with a 50mm lens, then you can't shoot slower than 1/50 of a second or you risk motion blur. If you are on a 200mm telephoto lens, which as you know is harder to hold steady, then you can't shoot slower than 1/200 of a second.)
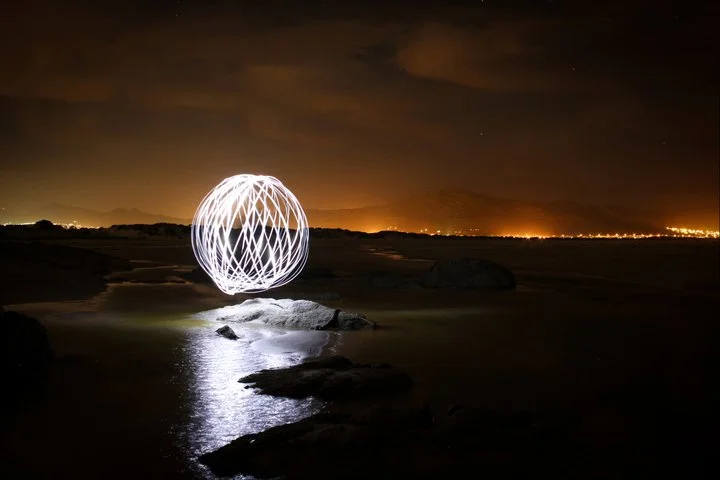
Here is a shot I took with a shutter speed of 30 seconds from a tripod with my friend Lennit swinging a single LED light around on a string:
ISO EFFECTS THE AMOUNT OF NOISE IN YOUR IMAGE: When you increase your ISO number to make your sensor more sensitive, you introduce noise or grain into your image. Different cameras are effected in different ways, and better cameras can be pushed further, but for this one you just need to remember that if you are pushing your camera to ISO 3200 to be able to shoot in a darker setting it will introduce noise, so be aware.
And that's it.
Those are the pieces to the 'manual mode' puzzle.
Now it's just learning to balance them to get the results you want in your images and the exposure you choose to create the look.
If you are going to open up your Aperture to get a shallow depth of field you will probably need to drop your ISO right down and speed up your shutter to compensate for the light coming in.
If you are going to speed up your shutter to freeze some action you will probably have to up your ISO and perhaps open your Aperture to get enough light in.
If you are getting too much grain in your image you will probably need to lower your ISO and try opening your Aperture right up, and slowing down your shutter speed a bit.
It's all a balancing act. Make your creative choices and then balance the elements to get the exposure you want.
Let me leave you with some scenarios and settings to solidify all this in your mind:
A portrait photographer wanting shallow depth of field:
- Aperture: f1.8
- Shutter Speed: 1/100
- ISO: 100
A landscape photographer wanting a deep depth of field shooting on a tripod in the evening:
- Aperture: f16
- Shutter Speed: 1/4
- ISO: 400
A sports photographer wanting to freeze the action in a well lit stadium:
- Aperture: f2.8
- Shutter Speed: 1/8000
- ISO: 200
An events photographer shooting a live band in a dimly lit venue:
- Aperture: f.2
- Shutter Speed: 1/100
- ISO: 1600
I hope that all makes sense, and that this info gives you enough courage to get out there and take control of your camera, and of your creativity.
Best of luck.
Steal like an Artist
I'm an avid blog reader.
I never studied photography, but fortunately we live in a day and age where it's possible to teach yourself anything, if you're willing to put in the time to find credible sources online, and follow along for those nuggets of info which will take you to the next level.
I recently did a photography day with a group of friends here in London. We hired a studio for the day between the four of us and then set about trying to fill slots with potential clients.
It promised to be an interesting mix of people coming through.
At one point I was shooting a local band named "Shawn Sanderson and the Charm Offensive". With four people standing in front of me waiting for me to tell them what to do I found myself immediately accessing countless shots and tutorials from Zack Arias, who is a Photographer based out of Atlanta, and has a ton of experience with Band Photography. It was then that I realised that his blogs (and many other besides) are slowly providing me an arsenal of solutions for different situations. It's very hard come up with a brand new shot from scratch so it often helps to have a catalogue of set ups in your head so you at least have a starting point. I threw up two lights to blow the background white, trying to remember my exposure numbers as I was dialing it in. I then used a 1m Octa as my key light; something I have seen Zack do on a tutorial before. I didn't have a nice reflective polyboard for the floor, but swapping a drop shadow for his nice reflective touch, I found I was pretty close to something I liked and could just tweak from there.
Here is one of my shots of Shawn Sanderson and co:

...and this is one of Zack's shots which I had in mind while shooting:
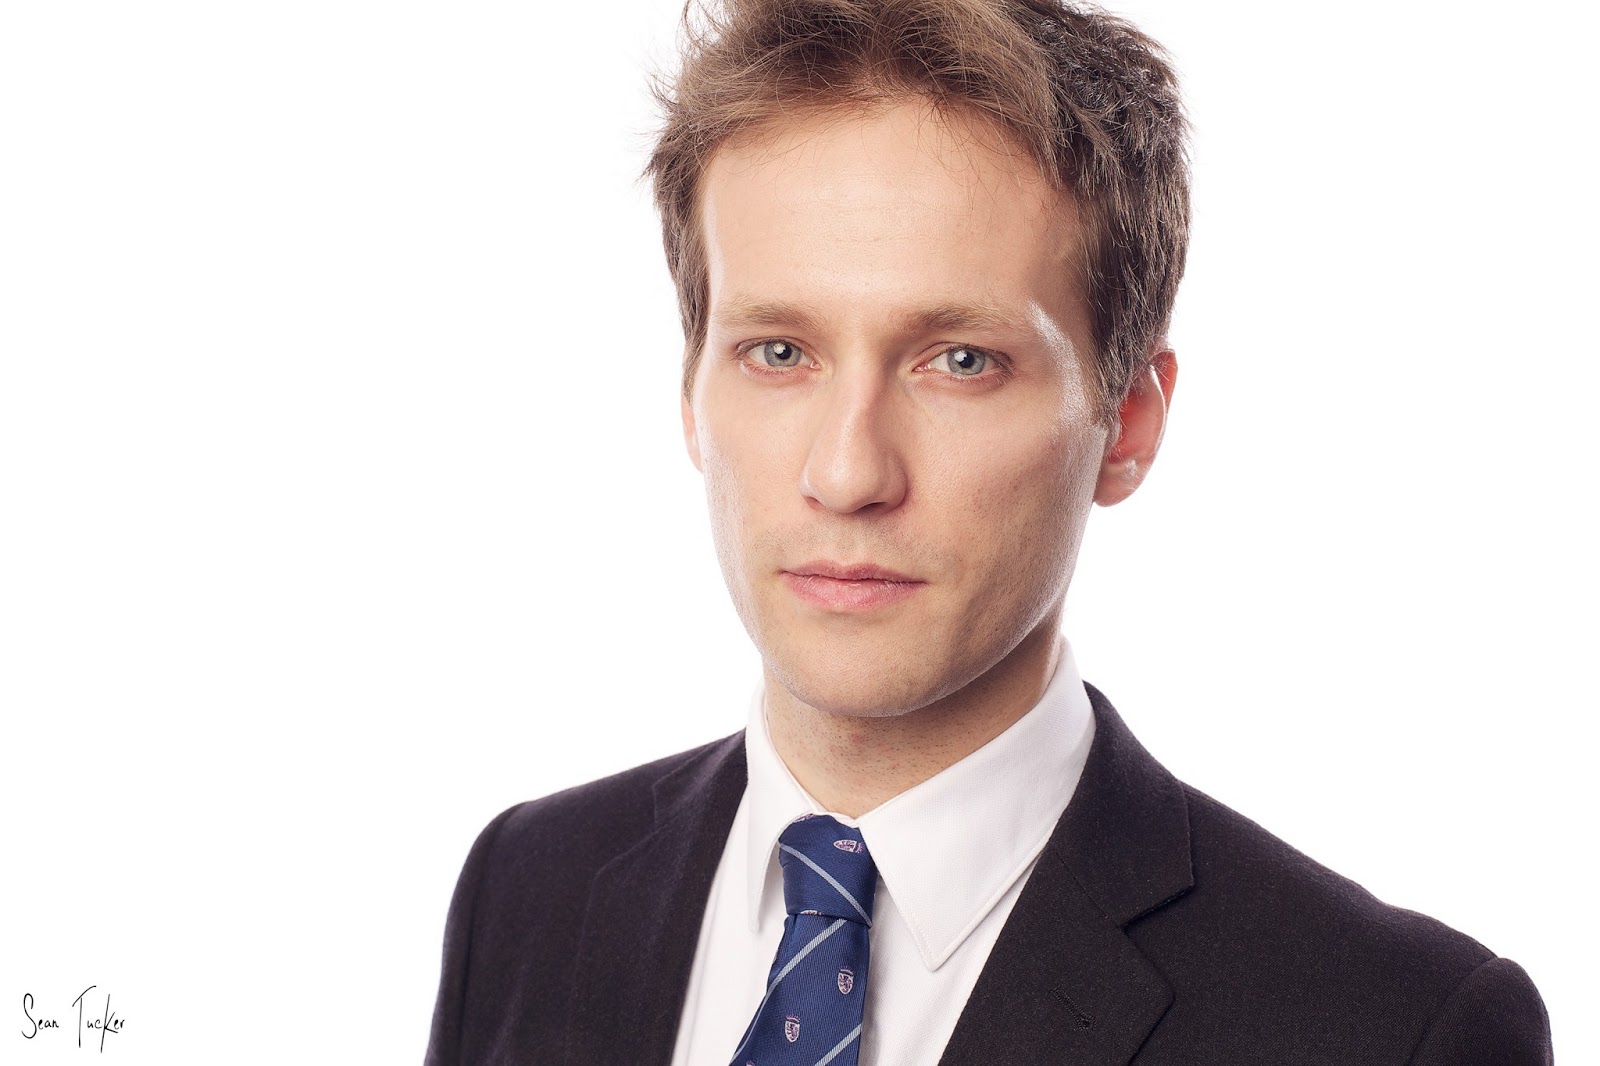
Later on in the day I had booked an up and coming Lawyer who was looking for some corporate headshots. This time my mind went into 'Peter Hurley' mode. I tried to mimmick the clean look of his white background lighting. I remembered that he lights his female subjects with flat even light, but uses side light for his male headshots to accentuate shape. I also remembered his 'kicker' light on the jawline to give a bit of separation.
I tried to coach the subject through different expressions leading him to something which would be flattering but natural. I had Peter's voice in my head reminding me about "eyes, eye brows, mouth". I used his 'suction cup' technique to move the head, and even spoke about 'the squint'; all things you'd be familiar with if you follow his work. The only thing I lacked was his bullet prood self confidence, but I think that takes more time to master.
Here is one of mine from the day:
...and here is one of Peter's shot which I had in mind:
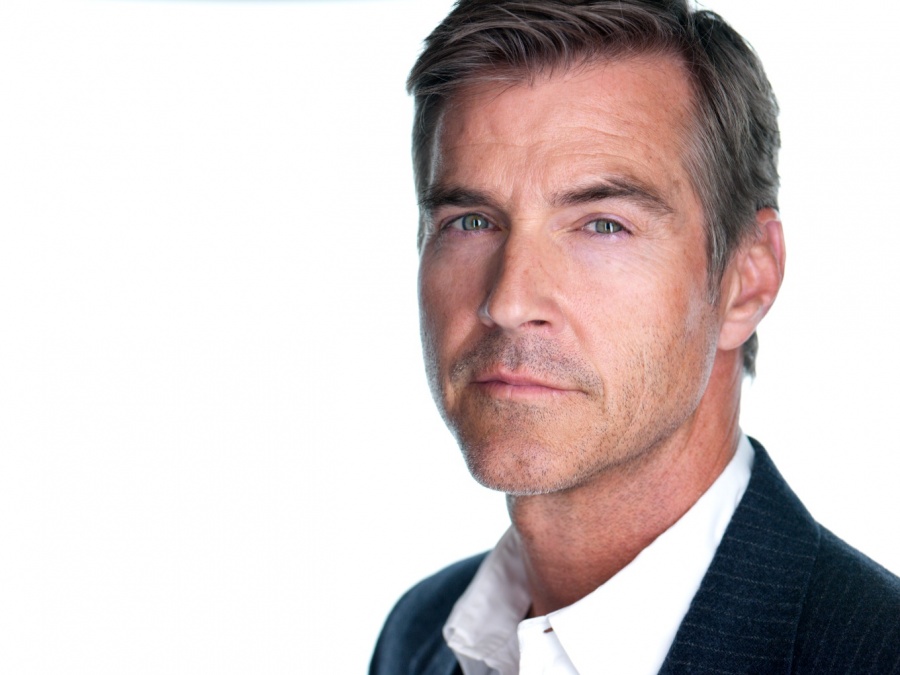
I posted the image on Twitter and tagged Peter, who was kind enough to respond with:

I'll take the compliment, and he's absolutely right about the expression (unsurprisingly), so I'll have to work on it more next time.
My point is: don't feel bad about using techinques you learn from others as a spring board. It sounds strange but I had a moment that day where I wondered if I was cheating by using all this knowledge I had learned from others so blatantly, but then I realised that you're never going to begin your career in photography with a fully formed identity and style. You have to start by imitating those you admire and learning skills from them which you can apply to your own work and create your own voice over time.
Obviously it's important to develop your own voice, but there is nothing wrong with 'transcending and including' as you go along. Start by building an RSS feed of voices you trust and people you want to learn from, and then read regularly, and build in time to experiment with the techniques so they are hidden in your mental bag of tricks when you need them most. If you want to track what I'm reading follow me on Twitter (@seantuck) because I make a point of sharing links which I have found interesting.
Good luck with your own learning.
Stick with it.
Follow the gurus.
Steal like an artist.
...and remember to be generous to those who have just started their own journey. Give them all the info you can. If they become a better photographer than you, it was likely always going to happen, and at least your will be credited as a generous contributor, rather than an insecure competitor.
Wells Blog
Duis mollis, est non commodo luctus, nisi erat porttitor ligula, eget lacinia odio sem nec elit. Maecenas faucibus mollis interdum. Nulla vitae elit libero, a pharetra augue.