london photography

Balancing Colours

 I recently shot for Moonika, who is building a portfolio to put herself out there for modelling.

Moonika BP C.jpg

She has the most striking red hair, and so early in the planning process I had to consider how to deal with, and compliment, such a strong colour.

Confession time: I am slightly colour blind, especially when it comes to reds and greens ironically. I often confuse them, particularly when they have similar tonal values. I actually have this constant insecurity that the colour balance in my edited shots isn't very good and no one is telling me I'm messing it up; like maybe everything I shoot has a slight green tinge for example and, best-case-scenario, people think it's a deliberate stylistic choice.

To compensate I have a few photography friends who I bounce my portfolio off to get some honest feedback and see if I'm off track. This is a really good idea by the way, especially while you're learning to colour correct your images. Source some trusted, honest, brutal opinion. 

When shooting though, I try and keep the colour wheel in mind to plan out some sort of balance, because it really is as important as spatial composition.

I found this great graphic on visual.ly, which explains many aspects of colour theory and gives a really helpful overview: 

color-theory_502910ba33eff.jpeg

Obviously I'm not thinking about all of this when shooting, although I do try and bring some of this knowledge into my compositions. At least knowing this stuff in the back of my mind often helps me to work out when something just 'looks wrong' and I can't figure out why. So it may look very complicated, but let me break down just two of the things I try and stay aware of:

Analogous Colours can add thematic interest. These are colours which sit close to each other on the colour wheel (Pink/Red). If you place these sort of colours together, especially in styling, you can create depth and interest while still playing on a theme. 

Opposite Colours provide separation.  In colour theory they are called 'Complimentary Colours' (Red/Cyan). They will give you the greatest separation from fore-background, whilst playing nicely together.

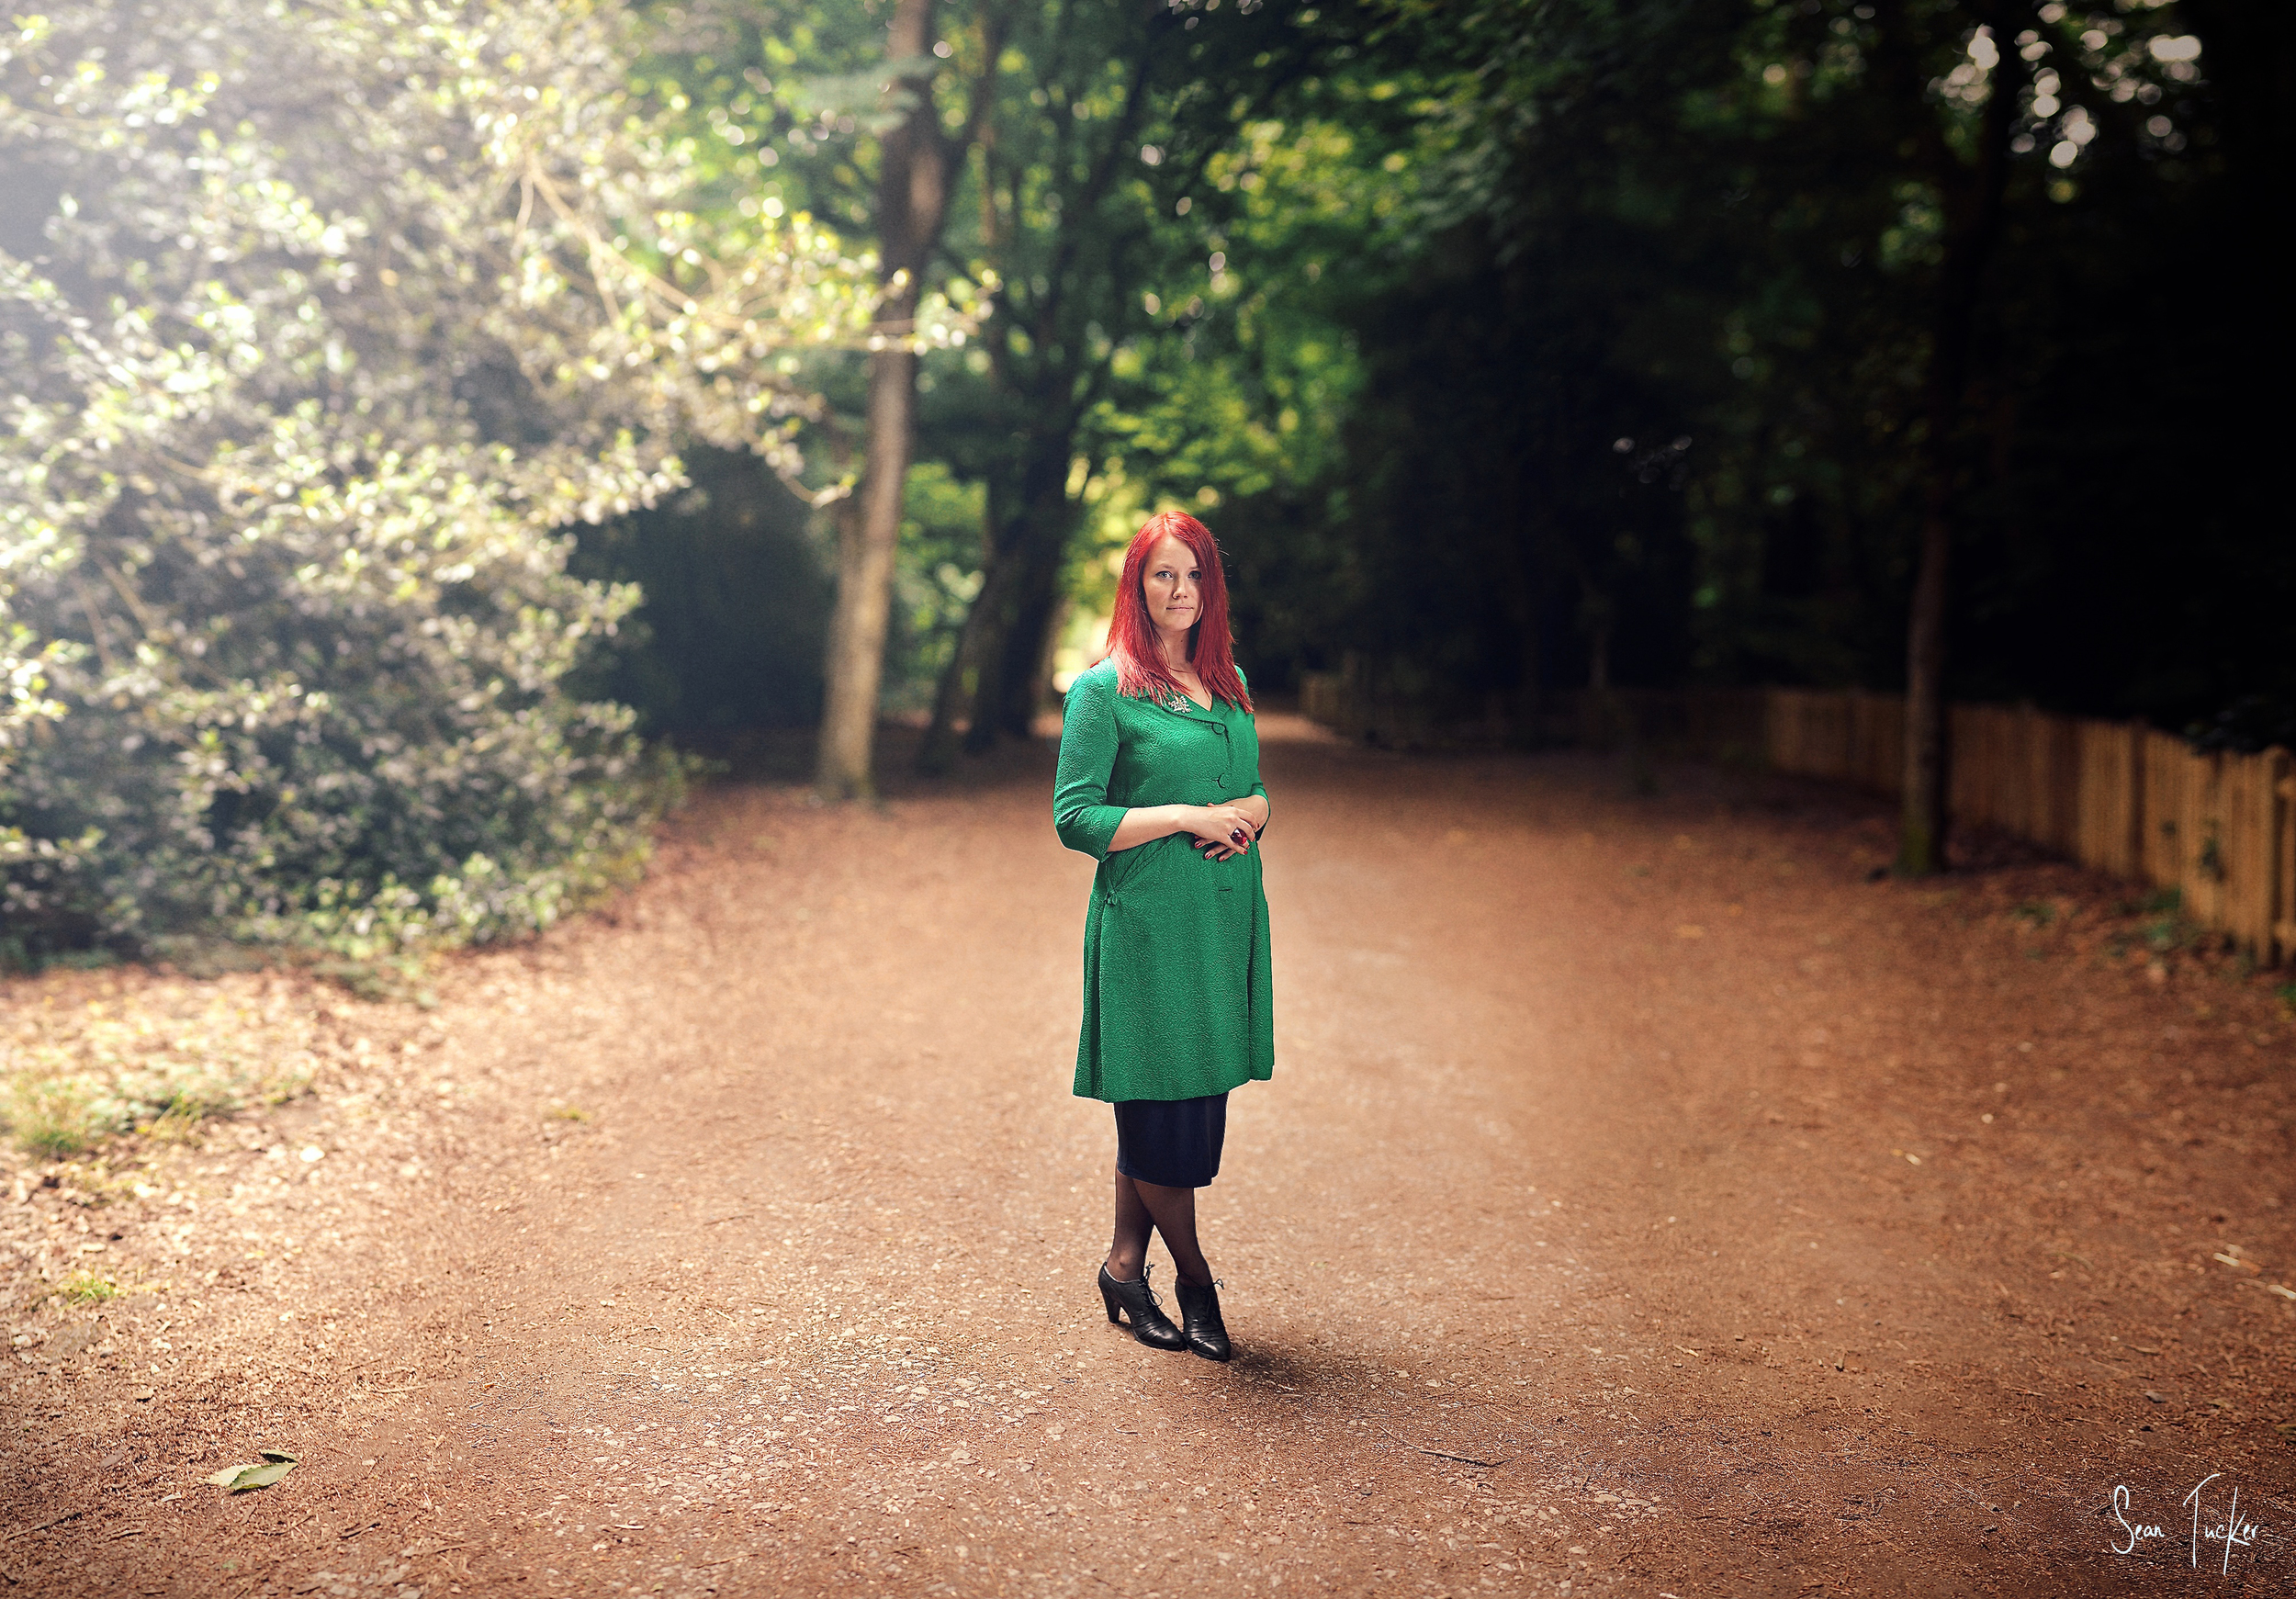
Let's take the next two shots of Moonika to demonstrate.

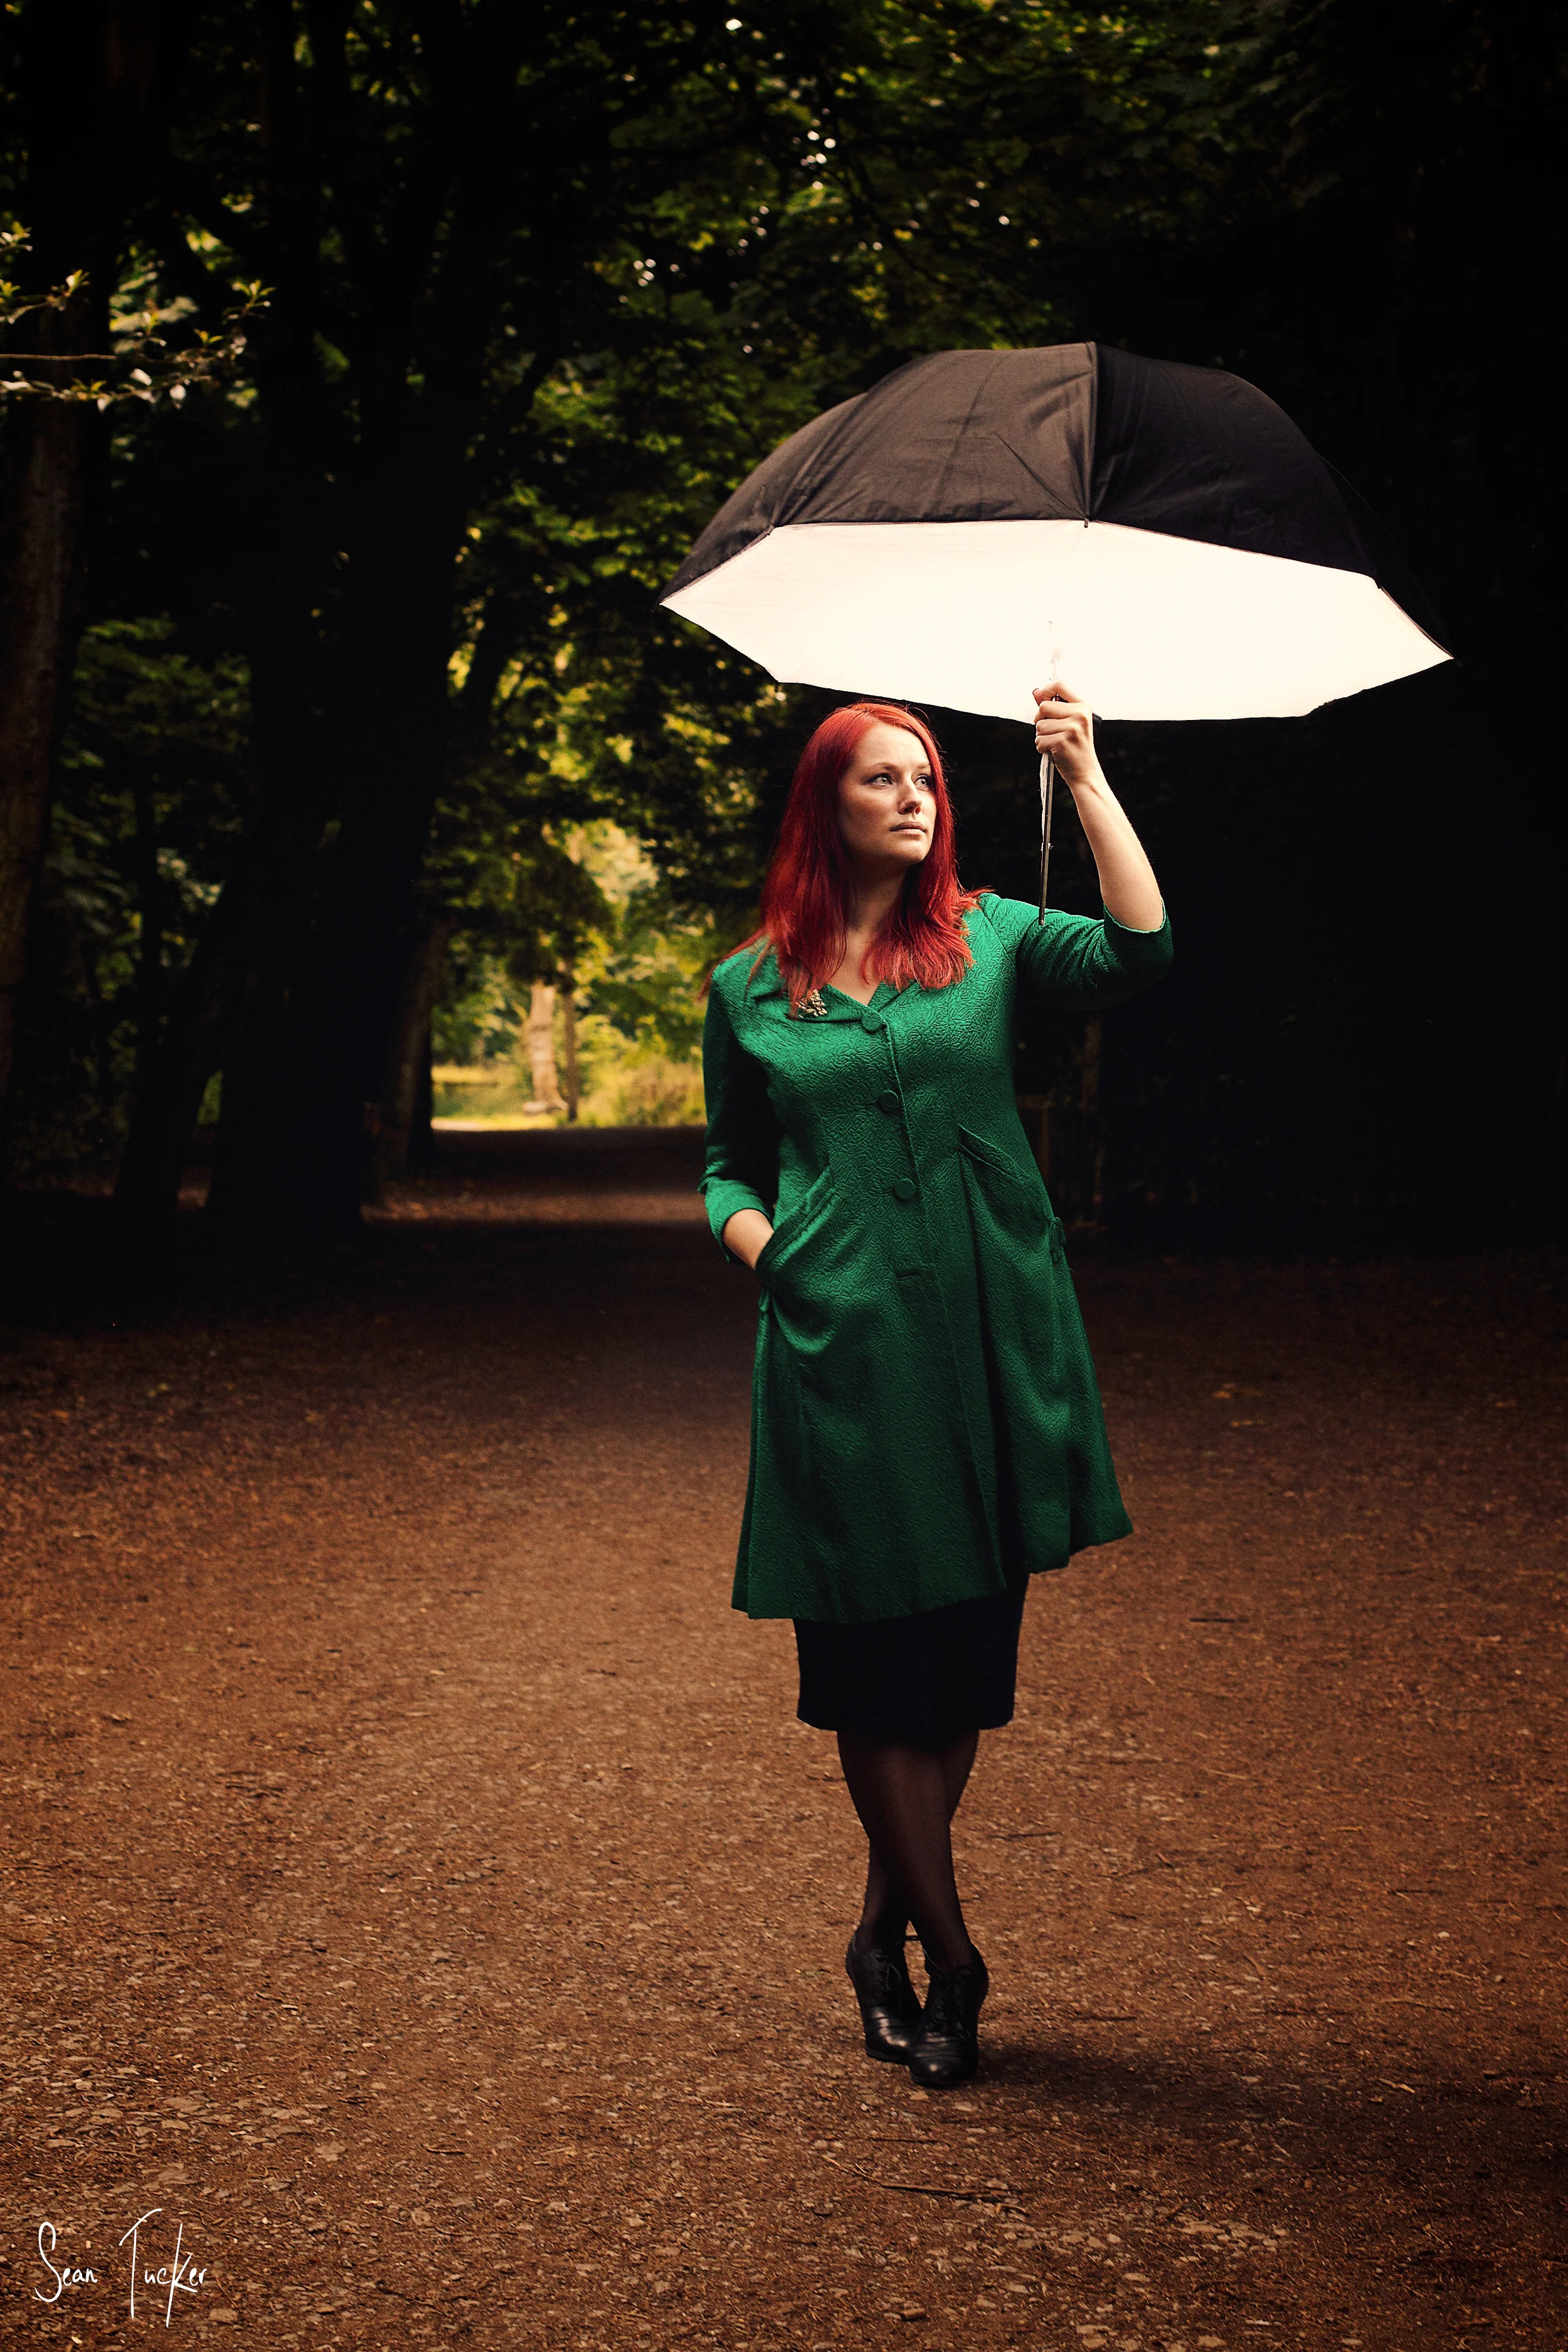
I used Analogous Colours in the styling. I say "I", but she brought along this pink scarf for the shoot deliberately, and as a costume designer herself, she understood that the combination of the pinks and reds works well together in colour theory. So the pink of the scarf and red of her hair give us an Analogous Colour theme, but now I have to separate her from the background.

The Complimentary Colour for red on the Colour Wheel is cyan, but there was no cyan to hand to use as a backdrop so I tried the next two best options: green and blue (which strictly speaking is triad theory in the graphic above, but I think you'll get the idea).

First I lined her up with a rich green background to make the red of her hair pop and it worked quite well. Fortunately she also had this great green coat which helped me frame the bottom edge of the image too and draw the focus into the middle of the frame. The green also helped to accent the deep green of her eyes and the colours played well together. The point was that I was getting the separation I wanted. 

Gloves Finalweb.jpg

But I also really wanted to try the blue because I had a feeling it would work well and give a very different feel. 

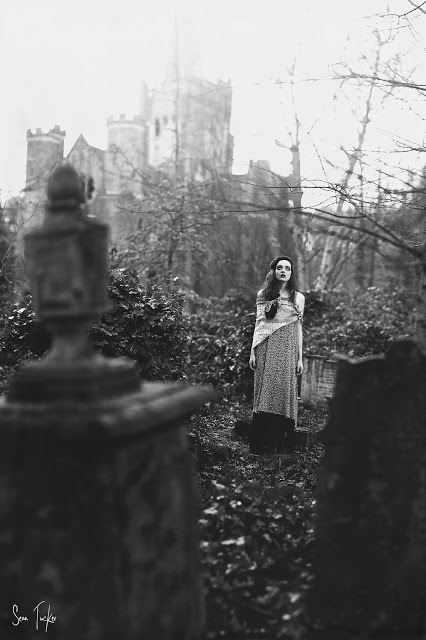
On the day, I was shooting with a photographer friend of mine, Radek (Check him out at Bayek Photography). While we were walking around he noticed a bush with very light green leaves, which when blurred out in the bokeh made her dark-toned hair really pop, so we decided to use it as a backdrop for a while. Even when taking the shot I knew what I was going to do with this image in the edit. I wanted to give the impression of a cold, icy background and let the cool desaturated texture give her hair that extra punch and separation, so when I got the image onto the computer I isolated the leaves in the background and turned them a chilly blue/grey. The final image makes me think of the White Witch in the Narnia Chronicles for some reason, but the point is the separation works really well.

Ice Queen Final web.jpg

I can't pretend that I'm always this deliberate, and admittedly the strong colour of Moonika's hair forced me to think more than I normally may have about this stuff, but I am always working hard to keep colour balance in mind when shooting portraits. It really can make the difference between a flat and uninteresting shot, and one that really pops.

Umbrella final.jpg

50mm: Focal Length Series

So this is the challenge I have given myself: to head out on a series of Photomissions where I am only allowed to use one focal length per session. I will walk the same route each time; between Waterloo Station and Oxford Circus Underground, and shoot using only one prime lens along the route to see what I can catch, and report back the experience and challenges of shooting with that particular focal length. I'm hoping to cover 24mm, 35mm, 50mm and 85mm.

This week it's the

50mm f1.4 prime.

NOTE: I am shooting on a full frame camera. If you're shooting on a cropped sensor camera (APS-C sensor) then these comments will apply more to a 35mm prime.

The Great Grandaddy of street photography, Henri Cartier-Bresson, was a proponent of this focal length, using it almost exclusively throughout his career. So I figured I would be in good hands with this one.

Starting off from the station I felt immediately at home with this focal length. I have heard people suggest that 50mm on a full frame camera is pretty close to the natural focal length of the human eye, and I could feel that straight away. I had this strange experience when I was looking around for shots to take; the moment I lifted the camera to my eye, the shot I had envisioned was right there in my viewfinder, with no intermediate calculation needing to take place.

It felt very natural.

When shooting with the 24mm, or even the 35mm, I found that I had to try and lock the focal length in my minds eye to predict the composition of each potential shot, but with the 50mm, "what you see is what you get."

I think this is why the 50mm is my favourite street focal length.

It's a great compromise between standing far off and compressing the background, and having to get in your subjects face, distorting them in the process. It gives you context by included background elements, but also separates your subjects nicely.

It really is a great allrounder.

In the world of primes, your legs are your zoom anyway, and I find the 50mm puts you in a comfortable place to shoot most of the action. It makes your viewer feel like a part of the scene, but doesn't mean you have to be shooting in people's personal space to do it.

There is this scene in the opening of "The Bang Bang Club", where one of 4 photojournalists covering the violent transition of power in '92 in South Africa, pulls out a long lens and begins shooting the action from a safe distance. The 3 other characters in the movie come hurtling past him right into the middle of the action with 50mm primes to get the shots. After things have calmed down they turn to their timid colleague and tell him to 'throw that lens away and get into the action with a 50mm, or else you can't call yourself a photojournalist.' Famous war photographer, Robert Capa, used to say, "If your photos aren't good enough, you aren't close enough."

There is a great deal to be said for the proximity of photographer to subject when it comes to street photography, and how this effects the viewers perception.

This lens will get you close without the compromises. I know some people take quotes like this and insist on shooting even wider (35mm) but I find that the trade off with distortion, and the fact that you effect the scene by getting too close, aren't worth it.

For me this lens is the one I use the most often. This is my street photography, go-to prime.

The Canon 50mm f1.4 was the first prime I bought and is my baby, both because of the quality, and the sentimentality as it marked my entrance into the world of serious photography. The 50mm prime is always the cheapest prime in any brand, and is often the first lens people buy for their DSLR's, aside from their kit lens. It is the gateway to a whole wide world of better photography, and the beginning of the deep, dark gear hole. The Canon 50mm f1.8 is only around £90 (R1000) and is so worth the price. If you can shell out a bit more for the f1.4 it is really worth your money.

If you want a way in, this is it. Go grab one and get shooting.

Here are some more of the shots I got:

85mm: Focal Length Series

So this is the challenge I have given myself: to head out on a series of Photomissions where I am only allowed to use one focal length per session. I will walk the same route each time; between Waterloo Station and Oxford Circus Underground, and shoot using only one prime lens along the route to see what I can catch, and report back the experience and challenges of shooting with that particular focal length. I'm hoping to cover 24mm, 35mm, 50mm, and 85mm.

This week it's the

85mm f1.8 prime.

NOTE: I am shooting on a full frame camera. If you're shooting on a cropped sensor camera (APS-C sensor) then these comments will apply more to a 50mm prime.

This is one of my favourite lenses at the moment.

I use it a great deal in the portrait shoots I do and love the way it separates the subject from the background, with beautiful bokeh and compression. With this in mind I knew I would be looking for individual subjects, and that this lens would give me the ability to pull them out of their surroundings.

Walking out of Waterloo this time I had to immediately adjust my viewpoint. I had last shot this route on the 24mm and was now on the other end of the spectrum. I stopped in the station for a little while and looked around through the viewfinder so I could lock the focal length into my minds eye. No point in jamming the camera up to my eye every few seconds for shots I would never be able to get at this focal length. I needed to be walking around with that 85mm frame in my mind to know what was possible, and to react to the right things.

I headed out and began looking for interesting people doing interesting things. It's something I am learning a lot at the moment: I would rather take a bad photo of an interesting subject, than take a slick photo of a boring subject. Learning to find those moments, or create them, and then capture them is really more than half the photographers job. We all focus so much on gear and techniques, but too few of us work on creating or finding great subjects which compel. We also have to come to terms with the fact that some days you'll find those subjects, and some you won't, and the only way to 'up' your chances is with perseverance, or "Tenacity!!", as my Grandfather would yell when giving his secret to life and success.

With street photography, you have to invest time. Be patient. Stay out as long as you can.

The other great thing about this lens is it allowed me stand off at a distance more often, and grab unguarded moments without being detected and altering the scene. I know that sounds voyeuristic, but it really is the nature of street photography. The moment someone notices you they will 'pose' or 'run', and you will have lost the opportunity to catch a real moment with a real human being. It's the constant battle of the reportage photographer: how to capture human beings without changing them. I know the arguments about shooting wider and being closer, but this longer focal length does have the payoff of anonymity, and right now that suits my non-confrontational style of photography well.

This Canon 85mm f1.8 is a fantastic lens. I only bought it recently and could kick myself for not buying it sooner. It's super sharp, with beautiful Bokeh. As a portrait lens it really is one of the best affordable primes and will give you professional results every time. Well worth a look.

Here are some more of the shots I got:

35mm: Focal Length Series

So this is the challenge I have given myself: to head out on a series of Photomissions where I am only allowed to use one focal length per session. I will walk the same route each time; between Waterloo Station and Oxford Circus Underground and shoot using only one prime lens along the route to see what I can catch, and report back the experience and challenges of shooting with that particular focal length. I'm hoping to cover 24mm, 35mm, 50mm, and 85mm.

This time it's my

35mm f2 prime.

NOTE: I am shooting on a full frame camera. If you're shooting on a cropped sensor camera (APS-C sensor) then these comments will apply more to a 24mm prime.

It was a beautiful sunny afternoon when I set off from Waterloo, maybe a little too sunny. I was a bit early for the 'golden hour', which is only arriving about 7:30pm in the UK at the moment, but I decide to make the most of it anyway. 

The first thing I noticed, not having shot on this lens for while, is how wide true 35mm is. I was instantly faced with a problem when shooting on the street; if I wanted to capture subjects I would have to get right in their face to do it. I couldn't stand off at a distance and shoot without people noticing. I would have to make myself obvious. Some photographers are good at this, but I'm not one of them, yet. In fact it got me thinking at one point that good photographers are really half technique, and then half sheer balls to get themselves in a postion to get the interesting shots. I think I'm still too self conscious, which is something I have to work on.

So I ended up shooting more 'scenes' than 'subjects', which is maybe the point of this focal length.

I know many photojournalists swear by the 35mm focal length. They suggest that shooting an event with a long focal length, from across the street, will give your viewer a sense of separation from the action, because, perhaps subconciously, they know the shot was taken far from the action. If you chose to use a 35mm to capture the action there is no choice but to get in it's face, and you carry your viewer into the midst of the action with you.

What I did love about this focal length is the context it gives you. It allows you to place your subject in it's surroundings. I am most used to shooting portraits close up at 50mm or 85mm, which means that my background usually becomes insignficant bokeh, rather than meaningful context. I enjoyed getting the shots back home and looking around the corners of the image and seeing faces and details I didn't notice in the second I snapped the shutter. 

I was concerned that I would be stuck with a lot of image distortion with the extra width, but it really wasn't bad. I didn't end up correcting any of it, and 35mm seems to be the last prime on the way down to wide that gives you a relatively pleasing persective which isn't distracting.

The 35mm f2 I was using is one of the 'cheap plastic' primes from Canon, but I was really surprised by how sharp it was. It performed very well in different light conditions, and there was a lot of high contrast 'light and shade'. If you're thinking about rushing out and buying one I really would recommend it, but just note that you do have to 'baby' these lenses a bit to get them to last the years, because the build quality isn't that great, but if you're willing to love it, it will give you some great shots at a really affordable price.

This is a focal length I definitely want to play with more, although I will have to strap on a pair to do it well.

Challenge accepted.

Here are some more of the shots:

...and a selfie:)

Bokeh Panorama

...also known as "The Brenizer Method" because this technique has been popularized by New York Wedding Photographer, Ryan Brenizer.

The idea behind the shot comes from a creative bit of problem solving. The question which needs answering is "How do I build a shallow depth of field (lots of focus blur) into a wide angle shot"? As you will probably know, when you shoot with a wide angle, everything is usually in focus. When you shoot at a longer focal length your background compresses, and you get a pleasing blur, or 'Bokeh', which serves to really separate your subject from it's surroundings.

So how do I build 'long focal length blur' into a 'wide angle shot'?

Well the answer is, "Shoot your scene by stitching together a series of images shot with a longer focal length, and low aperture, to make up your wide angle." This way you can create a shot with plenty of context, but your subject will now 'pop' off the out-of-focus background.

There are many techniques for this shot, but personally I usually use my 85mm f1.8, because I want both a lens which will compress the background, and has a low potential aperture (sub f2).

You need to start by composing the scene in your head. You obviously won't be able to do this through the lens as you normally would, so you need to imagine the borders of your shot. The trick then is to shoot in such a way that you piece together your total shot one frame at a time. It's vital to keep a track of the areas you've covered, which means you always have to have the big picture in your minds eye. Some people shoot in a spiral out from their subject. Some people shoot in a grid. You'll have to find the technique which works for you, but it's important that you cover all the areas of the total image otherwise you will have 'holes' in your final stitch which you'll have to deal with in post.

When you are ready to shoot you need to make sure all your settings are manual so they don't change from shot to shot. Remember you are shooting pieces of a whole image, not individual shots. Here's a check list to get yourself ready for the shot:

  1. Put your camera in Manual mode.
  2. Select the appropriate ISO depending on the ambient light.
  3. Set your aperture as low as your lens will allow so that your depth of field will be as shallow as possible.
  4. Dial in your shutter speed until you have the right amount of light for your subject. If you are shooting a person make sure the skin is exposed correctly.
  5. Set your white balance.
  6. Then focus your lens on the subject and click your focus to manual (you don't want your lens refocusing between shots).
  7. Plant your feet firmly and burn that final image into your mind.

Then build your shot one image at a time. I begin with the head and torso of my subject, then the legs, and then I begin to fill in the scene around him/her by shooting a spiral outwards from the body on all sides.

Here is a recent Bokeh Pano I shot with a French Model in Bermondsey:

And these are the raw shots out of the camera which went into making it up:

The number of shots you need to take will vary depending on the setting. I have shot some with 8-9 frames, and then some with 60+ frames, which was quite an ask for my version of Photoshop Elements to stitch together. You will also notice that I am making sure to create some overlap between the shots so as to ensure I have no holes in the final image.

After this I open up photoshop and run file/automate/photomerge, and then select all my images and let photoshop go to work. Sometimes it does a great job, sometimes there is some work which needs to be done afterwards to fix areas where the stitching hasn't worked.

A quick tip: if you are shooting a series of these Brenizer shots, just shoot a black frame (with your hand over the lens) between each set so that you can easily identify the first shot of each batch when you come to the editing stage.

This technique really allows for a quality image. Due to the combined resolution of all the shots you've used, you could blow this image up to the size of a billboard if you wanted to. Not to mention the fact that no lens in the world could actually get this shot, because it would have to be a 15mm f0.4 or something like that; and they don't exist... yet.

Get out there and give it a go!

Here are a few examples of other recent Bokeh Panos I've shot:    

To end off, here is Ryan Brenizer himself speaking about the technique and demonstrating its use:

Shooting on Brief

I mentioned in a recent post that Brooke contacted me to do a shoot with her. She had quite a strong vision for what she wanted to accomplish. In her words, she wanted a "Lolita" feel to the shoot. I haven't seen the movie myself but, between a quick google image search, and reference shots Brooke sent me via email, I quickly had a decent mood board full of shot ideas.

What a pleasure.

It meant that I wouldn't have to pull every shot out of thin air on the day, with an expectant subject looking at me, waiting for visual inspiration to strike. She had done the work for me. She knew her look, and she understood what she wanted. It was then just left for me to interpret it and make the technical choices to get the shots she was looking for. I know this won't happen every time, or even very often, but it showed me how much better a shoot can be when shooting for a client with a clear vision.

On a practical level I obviously wanted this reference material with me on the shoot.

Pinterest turned out to be a ready solution.

The week before I set up and shared a Pinterest board with Brooke where we could both pin images to use as a guide on the day. I downloaded the app to my phone which meant that I could pull up the different images we had pinned as we were shooting to use as inspiration, and to ensure we were getting the kind of shots we agreed on. It was like having a portable mood board.

Perhaps embarrassingly, this is the first time I've shot like this (with this much planning and purpose I mean), and it made for a much less stressful, and more productive, shoot. I often have those quiet moments of inner panic where I am trying to work out what the hell to shoot next, and what the client will think of my next crazy shot idea; but using this method I had all that covered before I even arrived.

Not only this, but Brooke could see exactly what we were aiming for as we were setting up for the next shot, and she could instantly know how to pose and hold herself, rather than me having some secret vision I was slowly trying to direct her towards. It really greased the wheels and meant we got all these shots done (and more besides) in under an hour.

I am hoping to make this part of my work flow for all briefed shoots in the future.

It really works.

For the technical stuff; these shots were all taken with my 5DmkII and either my 50mm f1.4 or 85mm f1.8 lenses. The only additional light used was a large reflector with mixed silver and gold to bounce the sunlight back in as fill. Shot 3 is a Bokeh Panorama, which I will get to explaining in a post soon.

Find Your Angle

On New Years Day I went into London to shoot the Parade.

The streets were lined, 2 or 3 people deep from the curb, with on lookers from all around the world, wielding their own cameras. As the parade began to go by, and with a cursory glance at the LCD screens of the cameras around me, I realised that I was getting exactly the same shots as everyone else.

I had one of those moments of clarity where I realised that if I was just going to be replicating the shots everyone was getting that day, I genuinely didn't want to bother shooting at all. I'm not creating at that point, I'm merely doing a shoddy job of reporting.

Who cares if I have a full frame DSLR?

It would be difficult to pick my shots out of a line up from the images being grabbed by the happy-snap holiday makers with point-and-shoots all around me, unless I could find another way to shoot this parade.

I committed that if I couldn't find a better way to shoot this, or a different angle, then I would put my camera away, and head home. In fact, given the icy wind, it only took a couple of minutes of fighting the crowds and cold before I resolved to head back to the soup I had waiting for me on the stove.

I was walking back to the tube station and decided to take some back streets and avoid having to push my way through the mass of humanity crowding the road side along the parade route. I rounded a few corners and stumbled upon the prefect situation; I walked right into the staging area for the parade, and as luck would have it there was no security to stop me.

I stayed there for a good hour, walking among the floats and acts as they lined themselves up to join the throng on the main street. I was able to walk into the middle of the road and get down to eye level for some shots which, I knew, would be something more intimate than your average photographer was able to get further up the way. It was worth the walk, and made the whole mission worthwhile.

My 'take away' from the day was to always look for another angle. If I am shooting the same shots as everyone else, then I am not being creative enough.

It reminded me of a documentary I watched recently about 3 of the founders of MagnumRobert CapaDavid Seymour, and Henri Cartier-Bresson.

In their early adulthood they were in Paris during a series of protests, and as friends they decided to Photomission and cover the happenings. One of the commentators in the documentary spoke about how you could mix those photos up on a table and still be able to tell whose was whose. Capa loved strength and drama, choosing to shoot men with fists in the air. Seymour caught the softer side, capturing woman and children as they watched. Cartier-Bresson loved to find a new angle, an interesting composition.

Each found their own way of shooting the events; their own angle.

So...

Find another angle.

Find your take on what's happening.

Here are a few of the shots I captured: